
Are you tired of dealing with hard water problems like spots on your dishes, dry skin, and clogged pipes? Installing a Waterboss water softener could be the simple solution you need.
But how do you get started, and what should you expect from the installation process? You’ll discover everything you need to know about Waterboss water softener installation. By the end, you’ll feel confident about making your home’s water softer, cleaner, and better for you and your family.
Keep reading to find out how easy it can be to improve your water quality today.
Choosing The Right Waterboss Model
Choosing the right Waterboss water softener model is important for clean, soft water. The right model meets your water needs and fits your home perfectly. This choice saves money and avoids problems later. Consider a few key points before buying.
Start by understanding your water hardness. Next, match the softener’s capacity to your household size. These steps help pick the best Waterboss model for your home.
Assessing Water Hardness Levels
Water hardness measures minerals like calcium and magnesium. These minerals cause scale buildup and reduce soap effectiveness. Testing your water shows how hard it is. You can use a test kit or ask your local water company.
Knowing hardness helps find the right softener strength. Hard water needs stronger softening. Soft water needs less. This keeps your system working well and lasts longer.
Matching Capacity To Household Needs
Water softeners have different capacities. This means how much water they can treat before recharging. Household size affects how much water is used daily. More people mean more water use.
Choose a Waterboss model that fits your water use. A small model suits a one or two-person home. Larger homes need higher capacity softeners. Right capacity avoids running out of soft water.
Preparing For Installation
Preparing for the Waterboss water softener installation is key to a smooth process. Good preparation saves time and avoids problems during setup. It helps ensure the system works well from the start. Two main steps help get ready: gathering tools and choosing the right spot for installation.
Gathering Necessary Tools
Collecting all tools before starting is important. You will need a pipe cutter, adjustable wrench, screwdriver, and Teflon tape. A bucket and towels are handy for any water spills. Have a drill and drill bits ready if mounting is needed. Check your tools to avoid interruptions during installation.
Selecting The Installation Location
Pick a dry, level place near your main water line. The spot should be close to an electrical outlet for power. Avoid areas exposed to freezing temperatures or direct sunlight. Ensure enough space around the unit for easy access and maintenance. The location must allow proper drainage for backwash water.
Shutting Off Water Supply
Shutting off the water supply is a crucial first step when installing a Waterboss water softener. It stops water from flowing and prevents leaks. This step makes the installation safe and smooth. Knowing how to shut off the water supply can save time and avoid damage.
Locate The Main Water Shut-off Valve
Find the main water shut-off valve in your home. It is usually near the water meter or where the main pipe enters the house. This valve controls the entire water flow inside your home.
Turn Off The Valve Slowly
Turn the valve handle slowly to close it. Closing it too fast can cause water hammer, which damages pipes. Make sure it is fully closed to stop water flow completely.
Drain Water From Faucets
Open a faucet at the lowest point in your home. This drains the remaining water from the pipes. It helps avoid spills and makes installation easier.
Check For Water Flow
Turn on a faucet to check if water is still flowing. No water should come out. If water flows, recheck the shut-off valve or look for a second valve to close.
Credit: www.homedepot.com
Connecting The Water Lines
Connecting the water lines is a key step in installing your Waterboss water softener. This process ensures water flows correctly through the system. Proper connection prevents leaks and keeps your softener working well.
Attaching Inlet And Outlet Pipes
Start by identifying the inlet and outlet pipes. The inlet pipe brings hard water into the softener. The outlet pipe sends softened water to your home. Attach each pipe firmly to its matching valve. Use the correct tools to tighten connections without damaging pipes.
Make sure the pipes fit snugly. Loose pipes can cause leaks or reduce water pressure. Check that the water flows in the right direction. Follow the manufacturer’s instructions for best results.
Ensuring Proper Seals And Fittings
Use plumber’s tape on threaded connections to create tight seals. This tape stops water from seeping out. Inspect all fittings for cracks or defects before installation. Replace any damaged parts to avoid future problems.
Double-check every connection after attaching pipes. Tighten fittings just enough to stop leaks. Too much force can break seals or pipes. A secure fit keeps your water softener running smoothly.
Setting Up The Drain Line
Setting up the drain line is a key step in installing a Waterboss water softener. The drain line carries waste water from the softener to a proper drainage point. Proper setup ensures the system works well and avoids leaks or backups. Follow clear steps to route and secure the drain hose correctly.
Routing The Drain Hose
Begin by choosing a drain location near the water softener. The drain hose should run smoothly without sharp bends. Avoid any high loops that can trap water. Keep the hose as short as possible for better flow. Use clamps or hooks to keep the hose in place along walls or baseboards. Make sure the hose end is inside the drain or standpipe but not sealed tight. This prevents air lock and allows water to flow freely.
Securing The Drain Connection
Attach the drain hose firmly to the water softener’s drain outlet. Use a hose clamp for a tight fit. Check the connection to avoid leaks. Connect the hose securely to the household drain or standpipe. The drain point should be above the floor level to prevent backflow. Double-check all connections after setup. A secure drain line prevents water damage and keeps the system running smoothly.
Adding Salt To The Brine Tank
Adding salt to the brine tank is a key step in setting up your Waterboss water softener. The salt helps the system remove hard minerals from your water. Without the right salt and proper filling, the softener will not work well. This section explains how to choose the right salt and how much to add.
Choosing The Right Salt Type
Pick salt made for water softeners. It should be pure and dissolve easily. Common types include pellet, crystal, and block salt. Pellet salt works best because it leaves less residue. Avoid salt with too many additives. These can harm the softener and reduce its life. Check the salt package for purity level. A purity of 99% or higher is ideal.
Filling Guidelines For Optimal Performance
Fill the brine tank with salt to about half or two-thirds full. Do not overfill. Leave space for water to mix with the salt. Check the salt level every month. Add more salt before it runs too low. Keep the salt dry and free from debris. This helps the softener work smoothly and last longer.
Programming The Control Valve
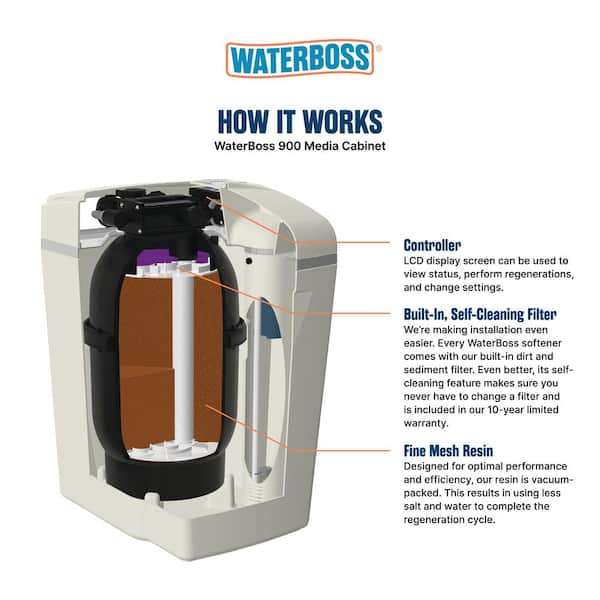
Programming the control valve of your Waterboss water softener is a key step. This process ensures the system works properly and fits your home’s water needs. The control valve manages the timing and cleaning cycles of the softener. Setting it right helps save salt and water while keeping your water soft.
Setting Time And Regeneration Cycles
Start by setting the current time on the control valve. This helps the softener know when to start cleaning. Next, set the regeneration cycle. This cycle flushes out hard minerals from the system. Choose a time when water use is low, like late at night. This keeps your water soft all day long.
Adjusting Hardness Settings
Check your water hardness level using a test kit. Enter this number into the control valve settings. This tells the softener how hard your water is. The system then adjusts the salt use and cleaning frequency. Proper settings save salt and keep your water soft and clean.

Credit: www.waterboss.com
Testing The System
Testing the Waterboss Water Softener system is a vital step after installation. It confirms the unit works properly and prepares it for daily use. Careful testing helps avoid future issues and ensures soft water flows through your home.
Running Initial Regeneration
Start the system by running the first regeneration cycle. This process cleans the resin beads inside the softener. It also fills the tank with fresh salt water. The cycle takes about 60 to 90 minutes. Watch the system closely during this time. The softener should complete the cycle without errors or interruptions.
Checking For Leaks And Proper Flow
Inspect all connections and pipes for leaks. Look for water dripping or pooling near the unit. Check valves and fittings to ensure they are tight. Turn on faucets to test water flow. The water should flow smoothly and feel soft. Any irregular flow or noise might signal a problem. Fix leaks immediately to prevent damage and maintain efficiency.
Maintaining Your Waterboss Softener
Maintaining your Waterboss water softener keeps it working well for years. Simple care helps avoid costly repairs. Regular checks ensure soft water flows in your home. Follow easy steps to keep your system clean and efficient.
Regular Salt Refills
Salt is key for your Waterboss softener. Check the salt level every month. Add salt before it runs out. Use high-quality salt made for water softeners. Avoid salt bridges or clumps that block salt use. Keep the salt tank clean and dry.
Cleaning And Troubleshooting Tips
Clean the brine tank once a year. Remove old salt and debris. Wash the tank with warm water and mild soap. Check the resin beads for dirt or damage. If water feels hard, check salt levels and settings. Reset the system if it acts strange. Call a professional if problems continue.

Credit: www.youtube.com
Conclusion
Installing a Waterboss water softener improves your home’s water quality. It helps reduce hard water problems like stains and buildup. The process is simple and does not take much time. Proper installation ensures the system works well for years. You save money on plumbing and appliances by using soft water.
Trust the right steps to get the best results. Enjoy softer water and easier cleaning every day.