
Are you struggling with hard water problems in your home? Installing a water softener can make a huge difference, but did you know that proper drain line installation is just as important?
If your water softener’s drain line isn’t set up right, it can cause leaks, odors, or even damage to your plumbing. You’ll discover simple, step-by-step tips to install your water softener drain line correctly. Keep reading to save time, avoid costly mistakes, and enjoy soft, clean water every day.
Choosing The Right Drain Location
Choosing the right drain location for your water softener is important. It affects how well your system works and avoids future problems. A good drain spot makes sure water flows out safely and keeps your home clean.
Check Local Codes And Regulations
Start by checking local rules about water softener drains. These rules tell you where and how to connect the drain line. Following codes prevents fines and keeps your installation safe. Some places have strict limits on drain locations.
Avoiding Common Drain Issues
Pick a drain spot that avoids backflow and clogging. Avoid places near sinks or toilets that can cause water to flow backward. Make sure the drain is open and clear to stop blockages. A good drain spot helps your softener last longer.
Distance From Softener To Drain
Keep the drain line short and straight. A long or curved line can slow water flow and cause leaks. Ideally, the drain should be less than 25 feet from the softener. This distance helps the softener work well and saves water.
Credit: structuretech.com
Gathering Necessary Tools And Materials
Gathering the right tools and materials is the first step in installing a water softener drain line. Proper preparation makes the job easier and faster. It also helps avoid mistakes that can cause leaks or damage. This section covers the essential items you need before starting the installation. Having everything ready ensures a smooth process from start to finish.
Essential Tools List
Start with basic plumbing tools for a proper installation. A drill helps make holes for the drain line. Use a pipe cutter or hacksaw to cut tubing cleanly. Adjustable wrenches tighten fittings securely. A tape measure ensures accurate length measurements. Also, have plumber’s tape to seal threaded connections. A bucket or towels are useful to catch water spills.
Selecting Proper Drain Line Tubing
Choose tubing designed for water softener drains. Flexible plastic tubing is common and easy to work with. Make sure the tubing diameter matches the water softener’s drain outlet. Check local codes for tubing material requirements. Avoid using garden hoses or pipes not made for drain lines. Proper tubing prevents leaks and ensures safe water flow.
Additional Fittings And Accessories
Gather necessary fittings to connect the tubing. Elbows and couplings help route the line around corners. Use clamps or brackets to secure tubing to walls or floors. Air gaps prevent backflow and protect water quality. Some installations require check valves to stop reverse flow. Double-check all accessories fit your tubing and setup.
Preparing The Water Softener For Installation
Preparing the water softener for installation is an important first step. It ensures the system works properly and safely. Follow these steps carefully to get your water softener ready for the drain line setup.
Turning Off Water Supply
Start by turning off the main water supply to the softener. This stops water flow and prevents leaks. Locate the shut-off valve near the softener and close it tightly. This step is crucial before any other work.
Draining The System
Next, drain any water inside the softener. Open the drain valve or bypass valve to release water. Use a bucket if needed to catch the draining water. This clears the system for safe installation of the drain line.
Locating The Drain Line Connection
Find the drain line connection on the water softener. It is usually near the brine tank or the control valve. Check the manufacturer’s instructions if unsure. Proper location helps secure the drain line correctly and avoids leaks.

Credit: www.youtube.com
Installing The Drain Line
Installing the drain line for a water softener is a key step in the setup process. It ensures the system removes brine and waste water safely. Proper installation avoids leaks and drainage problems. The process involves cutting tubing, connecting it to the softener, and securing it in place.
Cutting And Measuring The Tubing
Start by measuring the distance from the water softener to the drain location. Use a tape measure for accuracy. Cut the tubing to the correct length with a sharp utility knife or tubing cutter. Make sure the cuts are straight and clean. Avoid bends that could block water flow.
Connecting To The Softener
Attach one end of the tubing to the water softener’s drain outlet. Push the tubing firmly onto the fitting until it fits tight. Some models use a clamp or quick-connect fitting. Check the manual for your softener’s specific connection type. A secure connection prevents leaks during operation.
Securing The Drain Line
Run the tubing along its path to the drain point. Use clips or brackets to hold it against walls or baseboards. Space the fasteners every few feet to avoid sagging. Make sure the tubing slopes downward to help water flow freely. Avoid sharp turns or kinks that slow drainage.
Routing The Drain Line Safely
Routing the drain line safely is a key step in water softener installation. A well-routed drain line prevents leaks and ensures smooth water flow. Proper routing protects your home from water damage. Careful planning helps avoid common problems like clogs or backflow. Follow these guidelines to keep the drain line secure and efficient.
Avoiding Kinks And Bends
Keep the drain line straight as much as possible. Sharp bends or kinks can block water flow. Water may pool or back up if the line is pinched. Use gentle curves instead of tight angles. Check the line for any twists before securing it. A smooth path prevents clogs and damage.
Maintaining Proper Slope
The drain line must slope downward away from the softener. This slope allows water to drain by gravity. A 1/4 inch drop per foot is ideal. Without slope, water can sit in the line and cause problems. Measure and adjust the line’s angle carefully. Proper slope keeps water moving freely.
Using Clamps And Supports
Secure the drain line with clamps or brackets. Supports keep the line stable and prevent sagging. Attach clamps every few feet along the route. Avoid letting the line hang loose or drag on the floor. Proper support reduces wear and extends the line’s life.

Credit: diy.stackexchange.com
Connecting To The Household Drain
Connecting the water softener drain line to the household drain is a key step in installation. This connection ensures the softener wastes water and salt safely. Proper setup prevents leaks and water damage. Understanding the types of connections helps choose the best option for your home.
Types Of Drain Connections
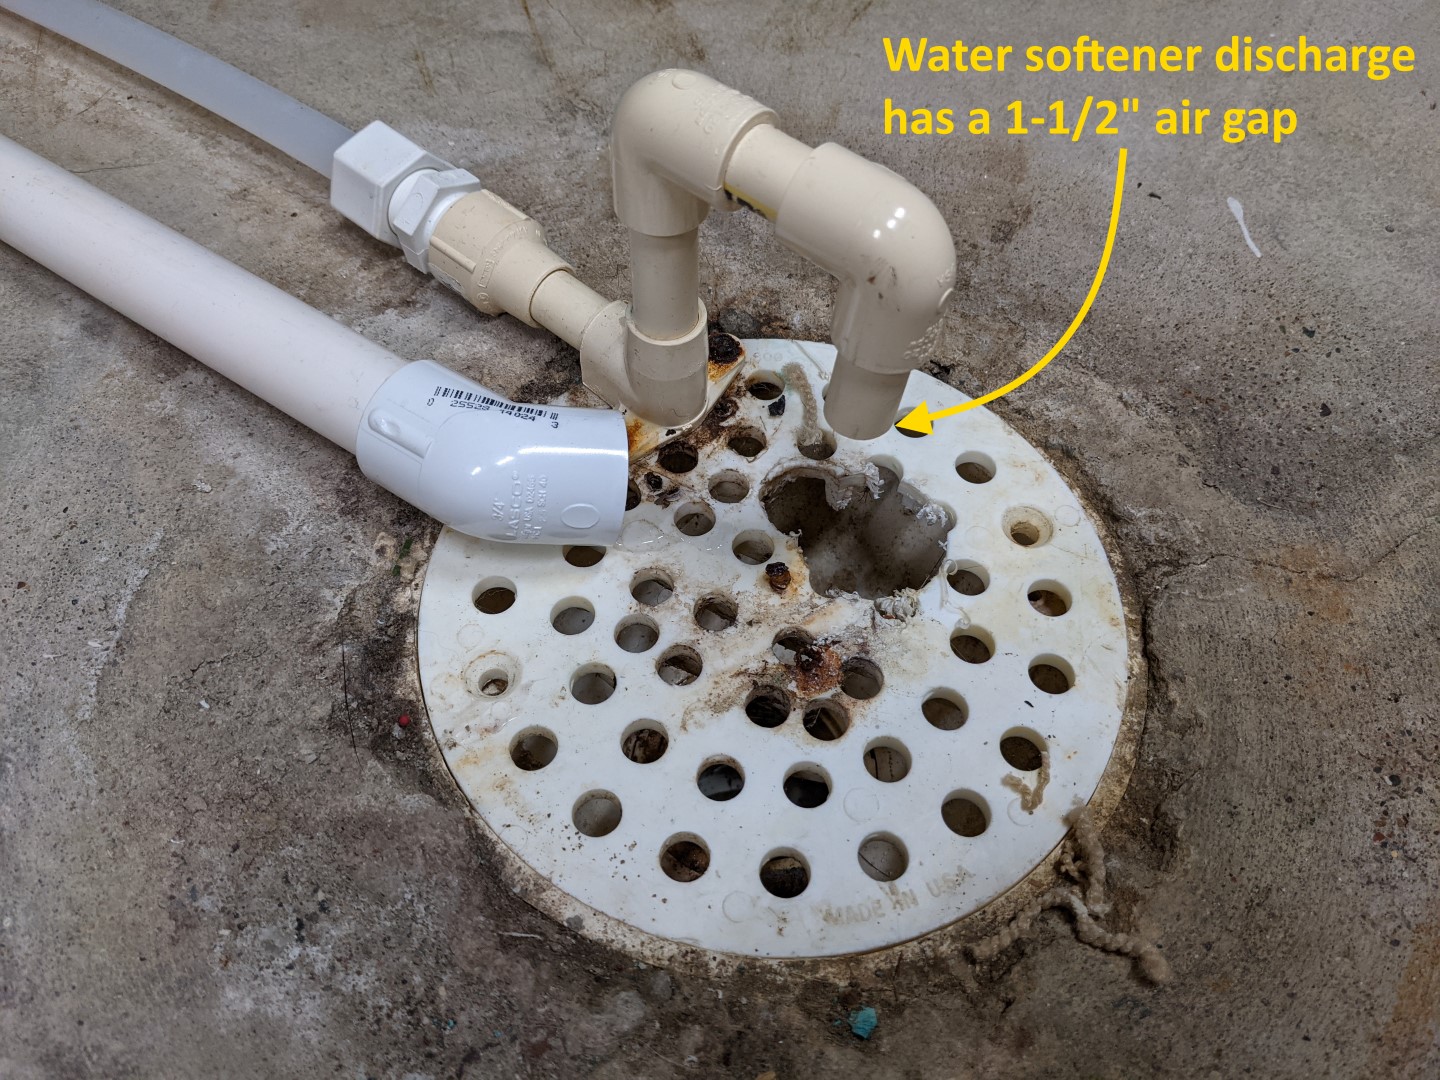
The most common drain connections include the air gap, standpipe, and direct drain. An air gap connection uses a small gap to stop backflow. A standpipe drains water into a pipe like a sink drain. Direct drain connects the softener drain line straight to a household drain pipe. Each type fits different plumbing setups.
Installing Air Gap Or Check Valve
An air gap is often required by plumbing codes. It stops dirty water from flowing back into the softener. A check valve lets water flow one way only. Installing these parts protects your water supply. Position the air gap above the flood level of the drain.
Sealing And Testing Connections
Use plumber’s tape or sealant on all threaded connections. Tighten fittings carefully to avoid cracks. After installation, run the softener and check for leaks. Watch the drain line during regeneration to ensure proper flow. Fix any leaks quickly to prevent damage.
Testing The Drain Line Setup
Testing the drain line setup is a key step after installing your water softener. It makes sure the system works right and avoids future problems. Proper testing helps protect your home from leaks and drainage issues.
Each test checks a different part of the setup. These checks confirm the drain line handles water flow and waste safely. Follow these steps for a smooth and effective water softener operation.
Running A Regeneration Cycle
Start by running a regeneration cycle on your water softener. This cycle flushes out minerals and cleans the system. Watch the drain line during this process. Water should flow steadily without stopping or leaking.
Checking For Leaks
Look closely at all drain line connections during and after the cycle. Check for water drips or wet spots. Tighten fittings if you find any leaks. A dry area means a secure connection.
Ensuring Proper Drain Flow
Make sure the water flows freely through the drain line. No blockages or slow drainage should appear. Water must exit the system quickly to avoid backups. Clear any clogs or kinks in the hose.
Maintenance Tips For Drain Line
Maintaining your water softener drain line ensures the system works well. A clean and clear drain line prevents backups and damage. Small efforts keep your softener efficient and extend its life.
Regular Inspections
Check the drain line every month. Look for cracks, leaks, or blockages. Make sure the line is securely connected. Early detection stops bigger problems later.
Cleaning And Flushing The Line
Flush the drain line twice a year. Use clean water to remove salt and debris. Avoid harsh chemicals that can damage the pipe. Flushing keeps the line clear and flowing smoothly.
Troubleshooting Common Problems
Watch for slow draining or unusual odors. These signs may mean clogs or buildup. Clear clogs with a soft brush or water pressure. Replace damaged parts quickly to avoid leaks.
Conclusion
Proper water softener drain line installation keeps your system working well. It helps avoid leaks and clogs that can cause damage. Clear drainage also protects your home’s plumbing. Take time to follow steps carefully for best results. A well-installed drain line saves money on repairs later.
Trust your skills and tools for a smooth setup. Clean water and soft pipes make daily life easier. Simple steps lead to long-lasting benefits.